28Aug


It is not often that the CAD industry gets shaken up as much as it has in the past 12 months. First we had Autodesk Fusion 360 coming out with a Cloud based service and we have recently received word of OnShape.
The pedigree of OnShape could not be purer, it is spearheaded by the founders of Solidworks, an industry favourite for as long as I can remember.

Welcome to the third instalment of the Smoothstepper series of posts. In this post we discuss what you need to do to make the computer communicate with the Smoothstepper over Ethernet.
When you connect you Smoothstepper to you computer you will need to make a very important decision: Which IP range do you want to use?
(more…)
In the first post of our series, we discussed some ways to mount your Smoothstepper in your control box. In this post we would like to share some thoughts on how to connect the boards electrically to you drives, switches, encoders and relays.
The most important connection to make is that between your computer and the Smoothstepper. Needless to say, we insist on using a good quality cable for this. All our Ethernet Smoothstepper bundles ship with CAT-6 Ethernet cables. If you have preferred the USB variant then it would be wise to buy a good quality cable and add a ferrite ring to it.

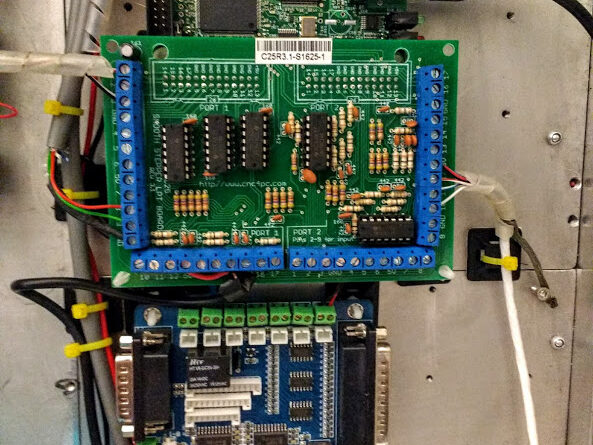
Thinking of the Smoothstepper 2.5 (USB version) or 3 (Ethernet) parallel ports in one (with benefits of course). So you have the options to go with three breakout boards (BOB) that then connect to stepper drives, switches or relays or an all in one solutions that incorporate the drives and the BOBs. The Smoothstepper is outfitted with 26 pin headers on it that will require suitable ribbon cables. We supply ribbon cables with the D25 port connector on the end as we have seen the boards mostly used with BOB's anyway.
As you may already know, Ports 2 and 3 of the Smoothstepper can have pins 2 to 9 set as inputs or outputs in the plugin. When selecting a BOB, make sure you are getting what you want because usually on port 2, pins 2-9 are input only.
For port 1 only, there is no reason not to go with the generic and readily available and cheap 5 axis breakout board. These boards usually offers optical isolation to your Smoothstepper and sometimes comes with a relay built in. Cheap and cheerful!
In some forum discussions it has been noted that the Breakout board optocouplers may not be as quick at reacting to pulses as the Smoothstepper is to send them. This may be the case on some very cheap breakout boards. On the ones we stock, the reaction time of the worst one was 175ns (nano seconds). That means they are able to accomodate frequencies of up to 5MHz, with the Smoothstepper being able to transmit at up to 4MHz.
A number of other suppliers have expansion boards that link directly to the Smoothstepper with the our recommendations being:
As users of the Smoothstepper in our machine, we thought it would be good to share our findings and some tips.
First and foremost let's debunk a myth that has been going round the various CNC communities saying that Smoothsteppers have bad support from the manufacturer. This is drummed on about on a number of fora/forums but it is not exactly the case. There has always been a forum on Warp9's website to assist people and the designers of the board have actively been trying to keep up with the demands and needs of their customers. It is true however that some of the responses have been slow in the past, thankfully the organisation of the company has changed and they are now up to speed. The Smoothstepper is by a long shot the best value for money feature packed motion control board on the market and that is why here at Emvio use it.
So with that out of the way lets get to some tips
Have you seen the new Smoothstepper Configuration Utility? If not then head on over to Warp9TD.com to find out more on this amazing development!


Both the Ethernet and the USB Smoothsteppers share the same mounting hole pattern. The hole pattern and dimensions are both available in the user manuals. What if you just want to hold it done on a plate without drilling and tapping? As part of our series of tips, we will show you what we do on semipermanent installations!
Industrial cabinets have long used the DIN rail to mount all sorts of automation and safety component.
Luckily some lovely person has also made models for 3D printing of brackets specifically to be used with the Smoothstepper.


The Gallery below details a quick method with which we have mounted the Smoothstepper in the first photograph of the post.
We are sure you will come up with your own methods of mounting. If you would like us to include photos in this section to show them off, we would love to hear from you.
Stay tuned for more tips!